
السبت، 15 يناير 2011
الجمعة، 14 يناير 2011
Twisted Lycra Lamp
لمبة رائعة تستخدم لتزيين المنزل:
This LAMP with all of it’s twists and turns looks great
This LAMP with all of it’s twists and turns looks great
المطلوب للتنفيذ : قماش مطاط (ليكرا أو سباندكس) حوالى متر تقريبا - عدد 3 شماعة ملابس من السلك - دويل باللمبة والسلك الكهربائى - خيط وابرة - ماكينة خياطة - دبابيس ابرة - زردية
Materials :
- 1 yard of super stretchy Lycra or Spandex fabric
- Sewing machine
- 3 wire hangers
- 6’ Socket and cord set
- Needle and thread
- Pliers
- Straight pins
Instructions:
- Unwind the 3 wire hangers so that they are just long pieces of wire.
- Cut your Lycra/Spandex 20” by 36”.
قصى القماش حوالى متر طول فى 50 سنتيميتر عرض
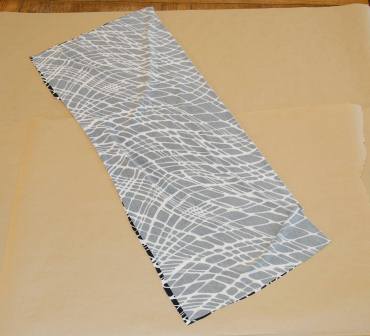
- Fold it in half, right sides together, and sew a 36” long tube out of your Lycra/Spandex. Turn it right side out اثنى القماش طوليا وخيطى الجانب المفتوح معا بماكينة الخياطة ثم اقلبيه على الوجه
- Bend each wire hanger into an 18” diameter circle with the excess spiraling off.
افردى الشماعات السلك ثم اقطعى حوالى 45 سنتيميتر ثم اغلقى الحرفين سويا بالزرادية لتصنعى دائرة منها وكررى ذلك مع باقى الشماعات

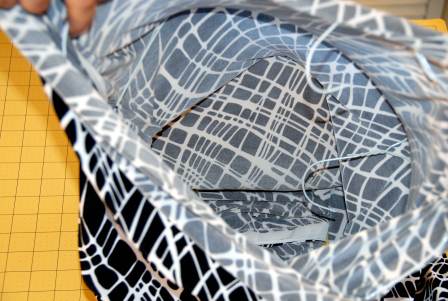
- Smoosh one wire circle and spiral inside the middle of the tube and the other two at each end with the circle part of the wire toward the mouth of each end of the tube.
خذى دائرة من السلك وضعيها فة منتصف اسطوانة القماش وثبتيها بالابرة والخيط حتى لاتتحرك داخل الاسطوانة - ثم ثبتى الدائرتين الأخريين على الحرفين من القماش بخياطة نظيفة بالابرة والخيط ايضا مع الاعتبار بان تكون الدائرة العلوية متصلة بسلك على هيئة جنش ( استخدمى الزرادية لتتمكنى من لوى السلك ) لتعليق اللمبة من الداخل وتكون بعيدة عن القماش حتى لايتأثر بحرارة اللمبة - انظرى للصورة بالأسفل
- Position the end wires so that there is 1” excess fabric. *This will be used to flip over and finish the edges later. Use your straight pins to keep all the wires in place.
- With your needle and thread, stitch around the circle part of each wire only to keep in place so it doesn’t move inside of the tube.
- Flip the 1” excess inside each mouth of your lamp and tack it down with the needle and thread. This hides the wire and gives it a nice finished feel.
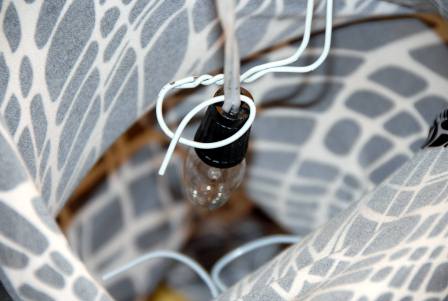
- Bend one of the end spiraling wires toward the top of the lamp so that it can wrap around the socket part of your socket and cord set and so that it keeps it in the center of your lamp and so the light bulb is not near the fabric at all.
*Since this lamp is so light it can easily hang from the socket and cord set. Just install a small hook and hang it up بعد اكتمال العمل امسكى الدائرة العلوية والدائرة السفلية ثم حركى الاولى ناحية اليمين والثانية ناحية اليسار لتجعليها فى شكل ملفوف لتعطى جمالا للعمل ثم علقيه فى سقف الحجرة او المكان الذى تريدين
وهذا هو الشكل النهائى:
.
الخميس، 13 يناير 2011
طريقة عمل مفرش كروشيه صغير وسهل

Size 4 steel hook
Small amount of size 10 thread
ما نحتاجه للتنفيذ :
نحتاج لابرة كروشيه معدنية مقاس 4 + القليل من الخيط باللون الذى تحبين ( يفضل خيط الغزل او القطن الرفيع )
1. Ch 6, join, ch 3, 11 dc in ring, join (12 dc)
2. Ch 5, (counts as dc and ch 2) *dc, ch2, dc* around, join in erd ch of beginning chain
3. Ch3, 3dc in ch 2 sp, *dc in dc, 3dc in ch2 psp, around, join.
4. Ch 5, sk 1 st, dc in next st, *ch 2, sk 1 dc, dc in next st*, around, join
5. Sl st into ch 2 sp, ch 6, *dc in ch 2 sp, ch 3*, around, join
6. St st into sp, ch3, dc, ch2, 2dc in same space, *2dc, 2ch, 2dc in next sp* around, join
7. St st into ch2, ch 7, *dc in next ch2 sp, ch 4* around, join in 3rd ch of beg. chain
8. St st into sp, ch 3, 4dc in same space, *5dc in next space* around, join.
9. Ch 3, sk 1 st, sc in next st, *ch 3, sk 1 st, sc* around join. Fasten off.
1. نبدأ بعدد 6سلسلات ونقفلهم ونعمل 3سلاسل كأول غرزة بريدة او عمود وبعد ذلك نعمل 11عمود = يكون عندنا عدد 12 عامود ونقفل السطر الاول بغرزة ضيقة ( بدون لفة )
2.نعمل 5سلاسل فوق اول عامود من السطر السابق ثم عمود فوق العمود التالى من السطر السابق ثم سلسلتين ثم عمود حتى ينتهى السطر بغرزة مقفولة
3. نعمل 3سلاسل كأول غرزة بريدة ثم نعمل عدد 2 غرزة بريدة فى الفراغ الذى نتج عن ال 2 سلسلة المتروكتين من السطر السابق ثم غرزة بريدة فوق العمود التالى نمن السطر السابق وهكذا حتى اخر السطر ونقفل ونجد مجموع الغرز فى هذا السطر = 12 غرزة بريدة
4.نعمل 5 سلسلات معا الثلاث الاول مكان اول بريدة وفوق التى قبلها من السطر السابق وعدد 2 سلسلة تترك فراغ ثم غرزة بريدة اخرى فوق العمود التالى من السطر السابق وهكذا حتى نقفل السطر ونجد معنا عدد 24 غرزة بريدة + عدد24 فتحة
5.نعمل 5 سلاسل كبداية: 3 كاول بريدة فوق البريدة التى تقابلها من السطر السابق + سلسلتين فوق الفراغ المتروك من السطر السابق ايضا ثم غرزة بريدة فى الفراغ المتروك من السطر السابق وهكذا حتى نهاية السطر ونقفل ونجد لدينا عدد 25 فتحة
6.نبدا بأول 3 سلاسل كأول بريدة ثم نعمل داخل كل فتحة متروكة من السطر السابق عدد 3 عواميد بريدة يكون مجموع ما لدينا من عواميد = 70 عمود
7.نبدأ بعدد 7 سلاسل = 3منها كأول بريدة +4 سلاسل تعمل فراغ كما فى السطر قبل السابق والذى سبقه وهكذا حتى ينتهى السطر بغرزة ضيقة تقفل السطر
8.السطر قبل الاخير يبدأ بعدد 3 سلاسل كأول بريدة ثم اربع عواميد من غرزة البريدة داخل الفتحات من السطر السابق = 5 عواميد بريدة فى كل فتحة وينتهى السطر كالعادة بغرزة ضيقة للقفل
9.السطر الاخير عبارة عن 3 سلاسل وغرزة ضيقة وهكذا حتى اخر السطر لتعمل مايشبه الفستونات كحلية للمفرش ونقفل السطر
توضيح
غرزة البريدة او العامود هى الغرزة التى نأخد فيها لفة على الابرة
الغرزة الضيقة هى غرزة بدون لفة على الابرة
غرزة السلسة هى الغرزة التى ننتج منها الحلقات التى نبدأ بها الشغل والتى تعطينا الفراغات المطلوبة اثناء الشغل
* هذا المفرش سهل وبسيط للمبتدئات فى تعلم الكروشيه وممكن تنفيذه واكبر منه بنفس الطريقة مع زيادة عدد الغرز كلما كبر الحجم
*ارجو ان يكون هذا البوست مفيدا وواضحا .... كما يسعدنى تلقى تعليقاتكم وافادتكم

Transform old t-shirts into a great scarf
سكارف مبتكر من أكمام التى شيرتات القديمة

Materials:
- About 5 or 6 old tee shirts
- Thread
Instructions:
- Take a tee shirt - any tee shirt. Check with the owner that you can have it! Cut the sleeves off. It doesn't matter if they are straight or on the slant.
قصى الأكمام من التى شيرتات ولايهم ان كان القص باعتدال او بالميل ( على حسب حردة الكم)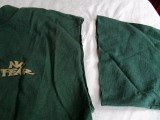

- Lay the sleeves out in approximately the order that you want to sew them. I usually use sleeves from the same tee shirt at each end and then use the same sleeves for the next one on each side so that the scarf ends up roughly symmetrical, but that's not a necessity.
رصى الأكمام بجانب بعضها البعض وضعيها متناسقة الألوان ( كما فى الصورة)
- It helps to use the end sleeve with the cuff or hem at the end (on the left in the photo) but after that it doesn't matter which way round you put the sleeves. Turn the 2nd sleeve inside out and slide it over the 1st sleeve until the ends are in line with each other.
خيطى الأكمام ولايهم ان تصليها باعتدال او بميل المهم ان تظهر فى النهاية بشكل اسطوانى متداخل الوصلات والألوان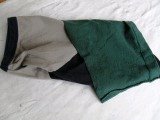
- If it's a long sleeve it's easiest to put your right hand through the sleeve and grab the end of the other sleeve and then pull to get the ends of the seams in line with each other.
- Set your machine to largest zigzag and longest stitch length and sew the 2 sleeves together. The zigzag allows for the stretch of the tee shirt fabric.
- If you have sleeves that were cut on the slant then just turn one upside down against the other so that the slants match. Where the sleeves are different sizes - as they are bound to be - just use the stretch in the smaller sleeve and tug a little or put a series of small folds or pleats in the larger sleeve.ويمكنك ايضا وصل الأكمام بطريقة رأساعلى عقب مثل الصورة التالية
 وهذا هو الشكل النهائى للسكارف فمارأيك ؟ هل أعجبك؟
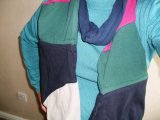
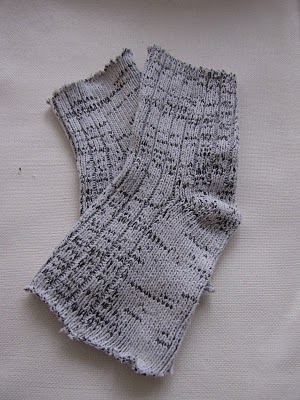
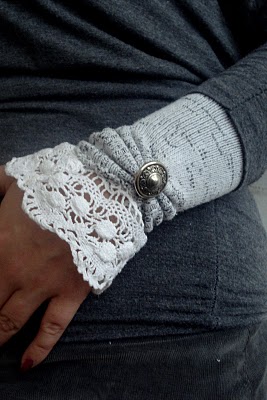
Transform an old Socks into wrist warmers
اعيدى استخدام الجورب وحوليه الى معصم جميل:
You can make your own warmers with the transformation of socks! The Transform Socks Into Warmers projects is super easy and results in a beautiful accessory.

Materials:سوف تحتاجين الى : زوج من الجوارب لديك - 2 من الأزرار المعدن - شريط حلية او ركامة
- Pair of socks
- Decorative button
- Ribbon or lace
- Tailor's Ham or small pillow
Instructions:
- Cut off the toes part. قصى الجزء الذى من ناحية الأصابع
- Turn the sock with the heel part upwards.امسكى الجزء من ناحية الكعب
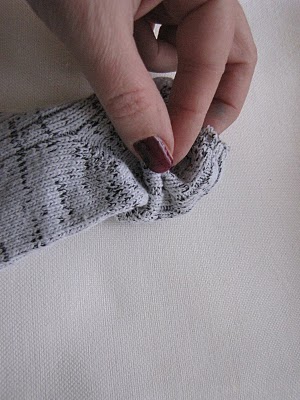
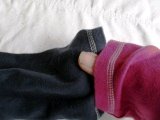
- Gather the part where the heel is, pin it and hand stitch it.اجمعيه بالكشكشة خاصة الجزء المنحنى وثبتيه بالابرة والخيط
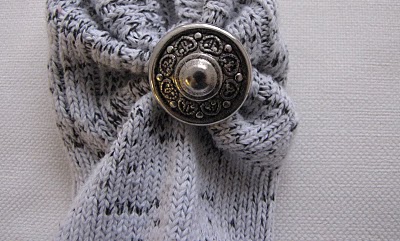
- Add a decorative button.ثم ركبى الزرار المزخرف
- Add some lace or ribbon.ركبى الشريط او الركامة على الحرف
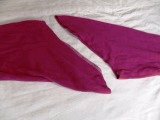
- You have to insert a tailor's ham inside before you stitch the lace. If you don't have a tailor's ham insert another pair of socks or a small pillow.
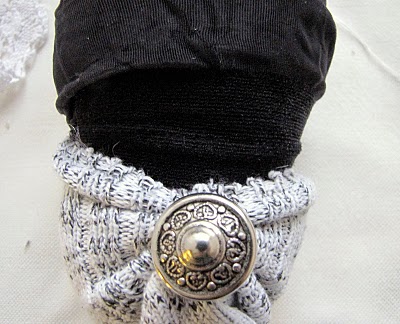
- Something that will expand the sock. Then (hand) stitch the lace.
- Your new, fabulous wrist warmers.الآن لديك معصم شيك تستطيعين ارتداؤه بتكلفة بسيطة وطريقة مبتكرة غير المتواجد بالأسواق


الثلاثاء، 11 يناير 2011
ورده مبتكرة من صنع يديك/Lovely fabric flower you can make
- Here is a great little project to liven up your wardrobe: Lovely Fabric Flowers. Embellish a shirt, dress up a pair of heels, or wear it as a pin. These four-step fabric flowers are versatile for everyday dress and a night out
قماش ساتان او شيفون أو أى قماش بوليستر قابل ان تسيح اطرافه بالشمعة اختارى منه لونين او ثلاثة(هنا اختارنا لون بنى ولبنى واسود)
شمعة - مقص حاد - خيط وابرة - خرز صغير الحجم
الطريقة :
قصى مجموعة دوائر مختلفة الحجم من كل لون كما موضح بالصورة ثم اشعلى الشمعة واحرقى حروف الدوائر بحرص بحيث تسيح وتصبح مغلقة الاطراف بشكل مبتكر متعرج بعض الشئ ( انظرى الصورة بالأسفل) لملمى الدوائر الأكبر فالأصغر ابدئى باللون الأسود ثم البنى ثم اللبنى والبنى وهكذا ثم ثبتى القطع كلها باستخدام الابرة والخيط من منتصف الوردة فقط ثم ثبتى اربعة خرزات فى داخل الوردة الآن تكوّنت الوردة الرائعة ذات الاستعمالات المتعددة حيث يمكنك استعمالها كاأكسسوار للحذاء او الشنطة او كولييه او حتى كبروش
أتمنى ان الفكرة تحوز الأعجاب

Materials:
- Synthetic satin/chiffon fabric that will melt
- Candle
- Sharp scissors
- Needle and thread
- Seed beads
Steps:
- Begin by cutting several circles from your fabric; these will be your petals. It doesn't have to be perfect, just a general circular shape. The more layers, the fuller your flower! Make each circle a bit smaller than the last - and if you are planning on needing a pair, cut out two of each size at once by folding the fabric in half. This way, your flowers will match.

- Hold each circle of fabric over the flame until it begins to melt the very edges. Keep it moving, do it quick! It takes a light touch but once you get the hang of it

Note: See how the melted edges cause the petal to cup? It's cool. It's nestable now! Do you have some stubborn edges that are hard to reach? Try using a hand held lighter like this to catch those trouble spots.
- Now, nest your petals together. You can stick with one color and texture or mix it up! I got wild and crazy by mixing satin in brown and blue and some chiffon in black.

- Now, with your needle and thread, sew up through the layers. String three seed beads onto the thread, then stitch back through the layers. You've just attached all your petals and gussied it up a bit. You can hit any odd edges with the hand held lighter after you've finished.

الاثنين، 10 يناير 2011
الأحد، 9 يناير 2011
مقتطفات
مبادرة :
تزوج أعرابى على كبر سنه فعوتب على مصير أولاده القادمين
فقال : أبادرهم باليتم قبل أن يبادرونى بالعقوق
عظة :
كان صالح اللخمى الدمشقى شاعراً وحكيماً وقد ذكر عنه أنه وعظ ابنه مرة وقال :
يابنى إذا مر بك يوم وليلة قد سلم فيهما دينك وجسمك ومالك فأكثر الشكر لله تعالى
فكم من مسلوب دينه ومنزوع ملكه ومهتوك ستره ومقصوم ظهره فى ذلك اليوم
وأنت فى عافية
الأيام خمسة :
يوم مفقود وهو أمس
ويوم مشهود وهو يومك الذى أنت فيه
ويوم مورود وهو غدك
ويوم موعود وهو آخر أيامك من الدنيا
ويوم ممدود وهو يوم القيامة
الاشتراك في:
الرسائل (Atom)
اشتراك في


